
Table of Contents
- What You'll Need Before You Start
- Best Tools for Screen Protector Installation
- Step-by-Step: How to Apply a Tempered Glass Protector Without Bubbles
- How to Remove Dust from a Screen Protector
- How to Fix Screen Protector Lifting at Edges
- Removing Bubbles After the Fact
- Common Mistakes and Post-Installation Care
- Frequently Asked Questions
Last Updated: September 30, 2026
What You'll Need Before You Start
Applying a tempered glass protector without bubbles comes down to three things: a clean screen, a dust-free room, and the right tools. Get those right and the glass settles itself.
This guide from Phone and electronics accessories walks through the full process, from surface preparation to fixing lifting edges weeks later. Most failed installs are not bad protectors. They are bad preparation.
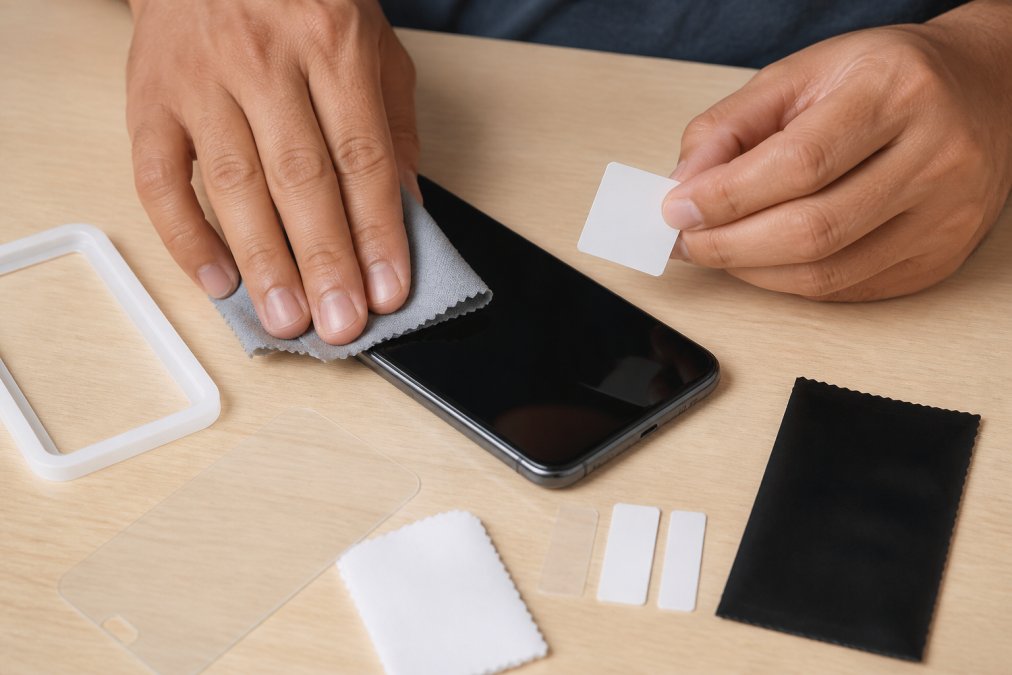
Here is what belongs in your installation kit:
- Microfibre cloth for lifting grease and fingerprints
- Alcohol wipe to strip oils from the glass
- Dust removal sticker for the last specks
- Alignment tool or positioning frame to line up the edges
- Squeegee or bubble removal tool for trapped air
- A clean, lint-free workspace away from pets and open windows
A tempered glass protector is a thin sheet of heat-treated glass that sits over your phone display, absorbing impact and resisting scratches. It bonds across the full surface through an adhesive layer, which is why trapped air shows up so clearly.
Work in a bathroom after running a hot shower. The steam pulls dust out of the air. It sounds odd, but it is the single best trick for a dust-free install.
Best Tools for Screen Protector Installation
The best tools for screen protector installation are an alignment frame, a dust removal sticker, and a stiff squeegee. Skip any one of them and you raise your odds of bubbles, lint, or a crooked fit.
An alignment tool matters more than people expect. Hand-aligning a protector almost always leaves one edge short. A positioning frame holds the glass above the phone, so you can check the fit before the adhesive ever touches the screen.
What most guides miss is the order of use. The dust sticker goes on last, right before you peel the backing. Using it earlier just wastes it.
Here is how the main tools compare:
| Tool | Job | Best For | Skip It If |
|---|---|---|---|
| Alignment frame | Holds glass in place | First-time installs | You have a steady hand |
| Dust removal sticker | Lifts final specks | Every install | Never skip this |
| Squeegee | Pushes out air | Large bubbles | Small air pockets only |
| Alcohol wipe | Strips oils | Glass and plastic screens | Screen is already spotless |
| Microfibre cloth | Removes lint | Drying after wiping | Never skip this |
Step-by-Step: How to Apply a Tempered Glass Protector Without Bubbles
The full process takes about ten minutes. Rushing it is the main reason people end up with trapped dust and air pockets. The sequence below is the one that consistently produces a bubble-free result, and the order matters as much as the individual steps.
Step 1: Prepare Your Environment
Pick a room with still air and low dust. A bathroom after a hot shower works well because the humidity settles floating particles. Run the shower for five to ten minutes, then let the room sit for a couple of minutes so the surfaces are damp but not dripping.
Turn off fans and close windows. Give the surface a wipe so you are not working above crumbs. Wash your hands and dry them fully, damp fingers transfer moisture to the adhesive and create clouding under the glass.
If you cannot use a bathroom, work at a table away from carpet, pets, and open doorways. A hard floor is better than a rug because there is less loose fibre to lift into the air.
Step 2: Clean the Screen Thoroughly
Wipe the display with the alcohol wipe first, then buff it dry with the microfibre cloth. Check the screen at an angle under a lamp. Any smudge you can see now will show through the glass later.
Run the dust removal sticker across the whole surface. Press it down, lift it, and move to a fresh spot. Do not rub it around, or you will just spread lint. Work in overlapping strips so no patch of the screen is missed.
Hold the phone up to a light source and tilt it. Dust shows as tiny bright specks against the dark screen. Repeat the sticker pass until you see none.
Step 3: Align and Apply the Protector
Drop the phone into the alignment frame. Peel the backing film away, then lower the glass from one edge. Let it settle on its own rather than pressing hard.
The hinge method is the safest technique if you are not using a frame. Peel the backing back only halfway, keeping the unpeeled half as a hinge.
How to Remove Dust from a Screen Protector
The fastest way to remove dust from a screen protector is to lift one corner with tape, slide a dust removal sticker underneath, and lay the glass back down. Do not peel the whole protector off unless you have to.
- Stick a piece of tape to the corner of the protector
- Lift the glass just enough to expose the speck
- Press a dust sticker onto the exposed adhesive
- Lower the glass slowly and smooth it flat
How to Fix Screen Protector Lifting at Edges
If the same edge lifts twice, the protector is the wrong cut for your device. Check the model number before ordering a replacement.
Removing Bubbles After the Fact
Most small bubbles disappear on their own within 24 to 48 hours as the adhesive layer settles. This is the single most useful thing to know: if the bubble is small and near an edge, wait a day before doing anything. Pressing at it too early can trap the air more firmly.
When to lift the protector
A bubble that will not budge after 48 hours is usually dust, not air. Air moves when you press it; dust stays put and casts a tiny shadow. If you can see a speck inside the bubble, lifting is the only fix.
To lift safely:
- Stick a piece of tape to the nearest corner of the protector
- Pull gently until the glass releases along one edge, do not force it
- Press a dust removal sticker onto the exposed adhesive to lift the speck
- Lower the glass slowly, working from the lifted edge back down
- Smooth outward from the centre with a cloth-wrapped thumb
Bubbles that come back
If the same bubble reappears within a day of fixing it, the cause is usually one of three things: a speck you missed, a curved display edge that the flat glass cannot follow, or a case pressing on the rim. Check the case first, pop the phone out and see whether the bubble settles on its own.
Common Mistakes and Post-Installation Care
The biggest mistake is cleaning the screen with a paper towel or tissue. Both shed fibres, and those fibres become bubbles.
Other common errors:
- Applying the protector in a room with a fan or open window
- Peeling the whole backing off before aligning the glass
- Pressing hard on the centre instead of smoothing outward
- Reusing a dust sticker after it has picked up lint
- Fitting a tight case the same day
Frequently Asked Questions
What is the best way to apply a tempered glass screen protector?
Start with a clean, dust-free workspace and wash your hands. Use an alcohol wipe followed by a microfiber cloth to remove oils and smudges. Peel the adhesive backing slowly, align the protector using a positioning frame or the hinge method, and lower it gently from one edge. Press from the centre outward to push out air pockets. A tempered glass protector with a quality adhesive layer will usually settle within a few minutes.
How do I get rid of bubbles under my screen protector after application?
Small air pockets often disappear on their own within 24 to 48 hours. For stubborn bubbles, lift the nearest corner slightly with a fingernail or a piece of tape, then use a squeegee or a credit card wrapped in a microfiber cloth to push the air out as you re-lay the glass. Avoid pressing too hard near the edges, as this can crack the protector or trap more dust underneath.
Why is the corner of my screen protector not sticking?
Lifting at the edges usually happens because dust or lint is trapped underneath, or because the phone case is pressing against the protector. Remove the case, lift the affected corner with tape, and use a dust removal sticker to clear any particles. If the corner still lifts, a small piece of double-sided tape under the edge can hold it down while the adhesive layer settles. Also check that your case is compatible with edge-to-edge coverage.
Can I use water to apply a tempered glass screen protector?
Tempered glass protectors are designed for dry installation. Unlike film protectors, they have a solid adhesive layer that bonds directly to the screen. Using water or a wet installation method can trap moisture under the glass, weaken the adhesive, and reduce touch sensitivity. Stick to a dry installation with an alcohol wipe, microfiber cloth, and dust removal sticker for the best results.
Bubbles and dust are avoidable, but only if you slow down and prepare properly. Phone and electronics accessories stocks screen protectors and accessories built for a clean, simple install, backed by free shipping, free returns, and a 30 day return policy. Our customers rate us 4.7/5 from over 1,000 reviews, with feedback like "Quality You Can Feel!" and "Compact and Efficient!" Order now and get a protector that goes on right the first time.


